The second tab in the IVR Designer is the Advanced tab. You don't really have to be an advanced user to make use of these tags, but they do indeed provide you with more sophisticated options in creating an IVR. Let's find out more about the critical buttons on this tab!
- Jump to Section
- The Advanced Tab buttons
- Get button
- AMD button
- If button
- Goto XML button
- SetVar button
- Stash button
- Analytics button
- Google Talk button
- Text Button
Please note that additional information on all of the Advanced Tab's buttons can be found in the CallFire XML section of this Help documentation.
The Advanced Tab buttons
The second tab is the Advanced tab, where you'll find nine additional buttons. As with the Basic tab buttons, you will drag and drop these buttons into the workspace to structure your IVR. 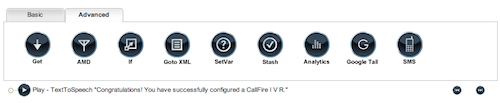
Get button

With the Get tag, you can call any URL or http request right from your IVR. This tag works with CallFire XML variables and the PHP script to obtain data from a specified source. The resulting data string can be stored under a varname and referenced later in the script.
After you place the Get tag into your structure, you'll need to define it in the Set Up New Action box.
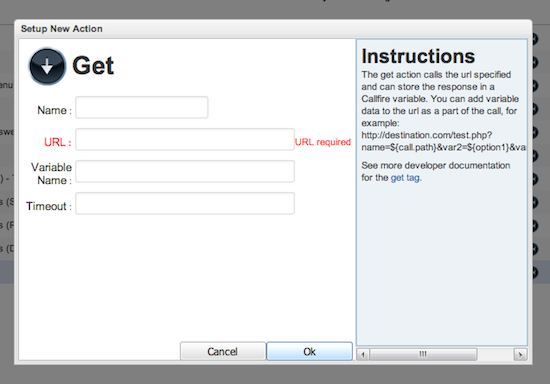
In the Get button's Set Up New Action box, there are four fields to fill in:
Name: Give your tag a name.
URL: Supply the URL address.
Variable Name: Name your variable.
Timeout: Define your timeout.
Then click the Ok button.
AMD (Answering Machine Detection) button

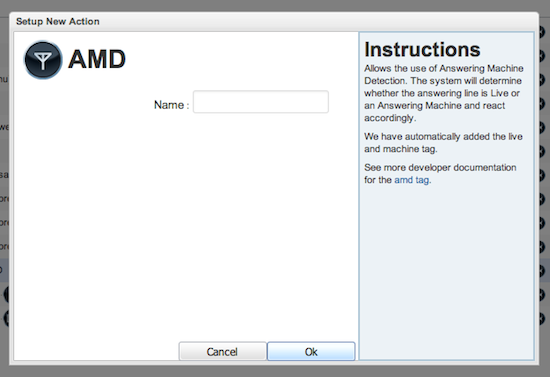
The AMD button allows the use of answering machine detection. The system will determine whether the answering line is live or an answering machine, and then proceed according to the IVR commands you have created. When you drag and drop the AMD button into an IVR, CallFire's system automatically adds one live and one answering machine tag underneath it. Live is the message that is played when a live person answers the call; Machine is the message that is played when the call reaches an answering machine.
You'll then need to give your AMD a name, as can be seen below. Then, click Ok.
If button

Here you can evaluate a JavaScript expression. If the expression is true, the tags directly beneath the the If tag will be executed. If the expression is false, the tags beneath the child Else tag will be executed.
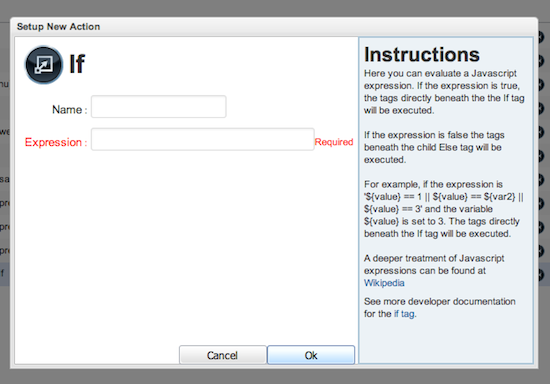
You will need to fill out these two boxes:
Name: Give your If tag a specific name.
Expression: Provide your expression.
Goto XML button

The Goto XML button jumps to a CallFire XML at a URL you specify. You can add variable data to the URL as a part of the call.
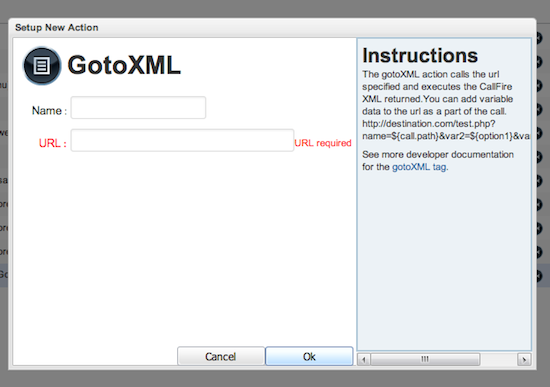
You need to fill out the two fields:
Name: Give the tag a name.
URL: Provide the URL address.
Then, click the Ok button.
SetVar button

The SetVar tag creates a variable which can be used later in the call. Drag the button down into the workspace, and then double-click the icon. This brings up the Set Up New Action box, as can be seen below.
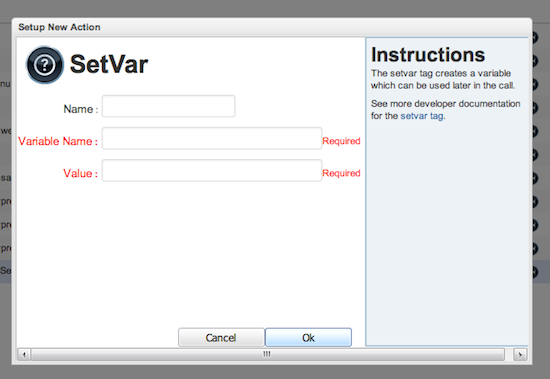
You will need to fill in the following fields:
Name: Give the tag a unique name.
Variable Name: Apply a name to the variable, which will be referenced later in the dial plan.
Value: Assign a value to it.
Then, click the Ok button.
Stash button

The Stash tag stores the varname and value for this call on the CallFire Call Details report. Using it lets you record and create records of responses. You can then export the list to an Excel file for better planning.
Please note that the Stash tag stores the contents of the variable in the Call Detail report. But it does not make the content available for later reference. To create a variable for later reference, please use the SetVar tag.
To create the Stash tag, you drag the Stash button down into the workspace and place it underneath the Key Press tag. It should be indented underneath. When you do so, you'll note the exclamation point, which reminds you that you need to assign values. So, now, double-click on the Stash tag, which brings up the Set Up New Action box.
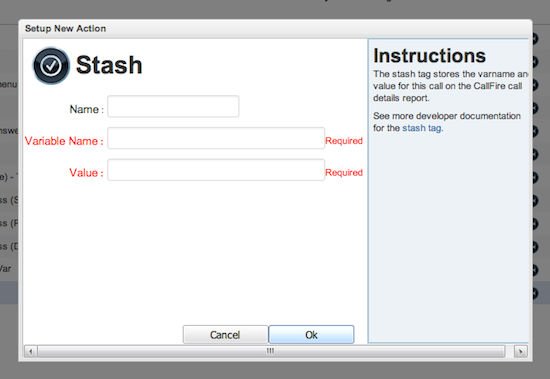
You will need to fill out the following boxes:
Name: Give your Stash tag a name. You might just call it "Stash," followed by the number of the key they'll press for that answer.
Variable Name: A suggested name might be "Response."
Value: Enter the number of the key they'll press to make their response.
Then, click the Ok button.
Then, click the Ok button.
Drag down a stash and apply values to each key press tag for which you want to create records.
Analytics button

The Analytics tag sends a Google Analytics pageview. It's a great way to track events and visitors. Please remember that all variable replacements are supported.

You will need to fill out the following fields:
Name: Give your Analytics tag a unique name.
Google Analytics Key: Provide your Google Analytics key (UA-XXXXXX-X).
Your Domain/Site: Enter your Google Analytics domain (www.yourdomain.com).
Category: Supply a category name for the objects you want to track (e.go., Sales, Support, Westcoast-Sales).
Action: Define an action, or string, that is uniquely paired with each category and commonly used to define the type of user interaction for the Web object.
Label: If desired, create an optional string to provide additional dimensions to the data event.
Text: Enter the text of your message.
For additional information, please see the developer documentation for the analytics tag.
Google Talk button

If you're not familiar with it, Google Talk is an instant messaging service that allows for text and voice communication. Within a CallFire IVR, the Google Talk tag is used to send Google Talk messages during a phone call. All variable replacements are supported.
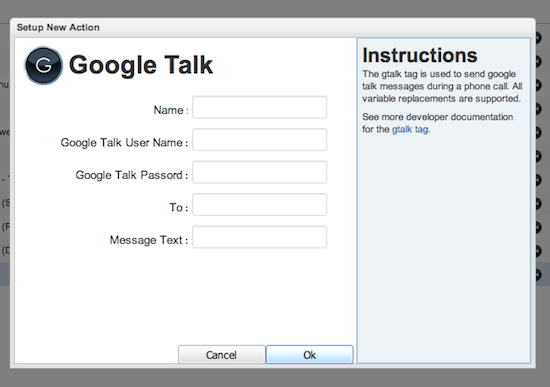
You will need to fill in the following boxes:
Name: Give your Google Talk tag a unique name.
Google Talk User Name: Provide your Google Talk user name.
Google Talk Password: Enter your Google Talk password.
To: Provide the Google Talk address for the recipient.
Message Text: Enter the text of your message.
For additional information, please see the developer documentation for the gtalk tag.
Text button

The Text tag sends out a text to a mobile device or many mobile devices.
Please note that in the previous version of CallFire, this tag is designated as "SMS." In the new version of CallFire, the tag is now called the "Text" tag.
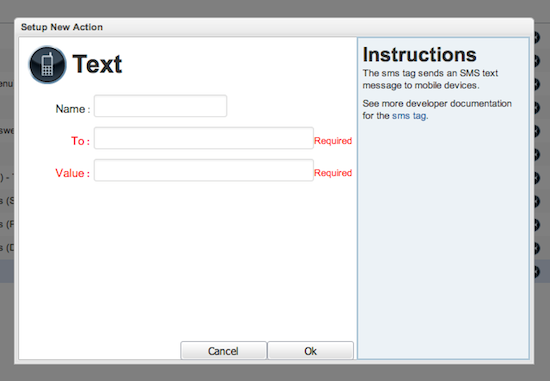
You will need to fill out the following boxes:
Name: Give your Text tag a unique name.
To: List the phone numbers you would like to send a text to, separated by a comma (example: 12132212255, 12132252256).
Value: Assign the appropriate value.