You're almost up and running with your CallFire Call Tracking campaign — but not quite yet! The Call Tracking Creation - Call Settings page, also known as the Call Settings tab, is where you make some important decisions about how you want to set up your Call Tracking campaign and which features you would like to enable.
- Jump to Section
- Configuring Settings
- Transfer To
- Sounds
- Office Hours
- Google Analytics
- Notifications
- Reset All Data
Configuring Settings
You configure the settings of your Call Tracking campaign on the Call Settings tab (shown below).
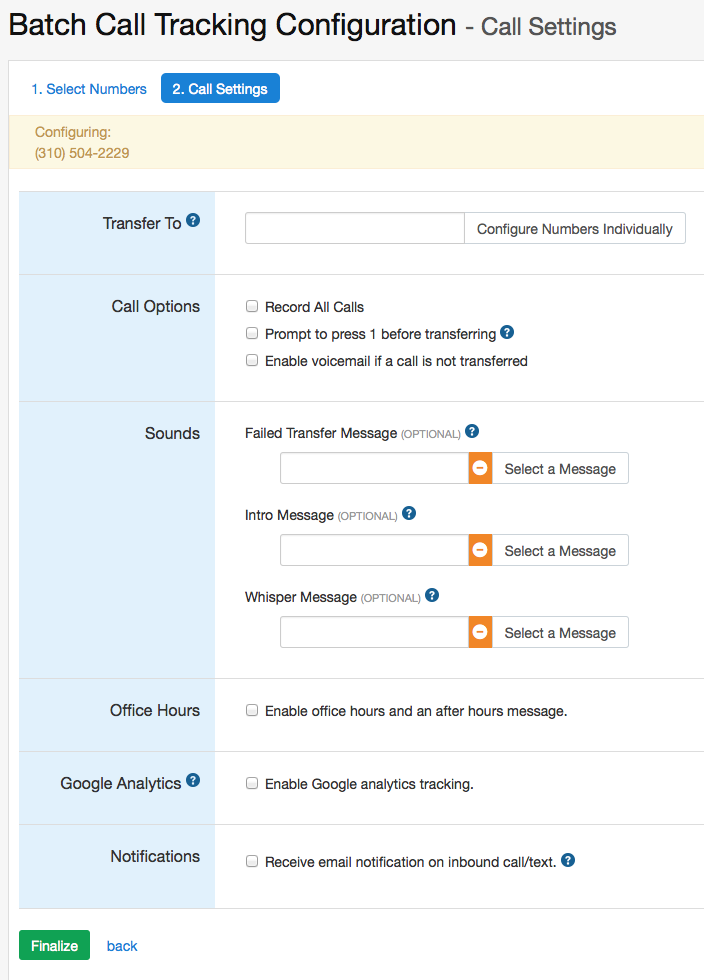
As you can see, there are several options you can choose and fields you can potentially fill in.
back to top
Transfer To
This field designates the phone number where callers will be transferred to after dialing your CallFire Call Tracking number. Most CallFire customers opt to have those incoming calls transferred to their main business phone number, though it can be transferred to most other phone numbers of your choosing.
Call Options
This section allows the selection of three accompanying options, which you activate by clicking the accompanying box:
The Record All Calls checkbox (above) allows you to record all incoming calls on on your CallFire tracking number that are connected.
The press 1 prompt checkbox (above) allows you to press 1 to take an incoming call when someone is calling your CallFire Call Tracking number.
The enable voice mail checkbox (above) automatically directs your incoming callers to your voice mail if the call is not successfully answered.
back to top
Sounds
The Sounds box contains three important options for creating messages that will make Call Tracking more efficient for both you and those who respond to your advertisements.
Failed Transfer Message
It doesn't happen often, but sometimes a potential customer of yours will see your Call Tracking number in an advertisement, call the number, and somehow the call doesn't go through correctly to the Transfer To number you designated. CallFire doesn't want you to lose that "hot lead," so we allow you to set up a Failed Transfer Message as a backup.
You do so by clicking on the Select a Message button in that section, after which you will see the Failed Transfer Sound Sound Selection pop-up window, as shown below.
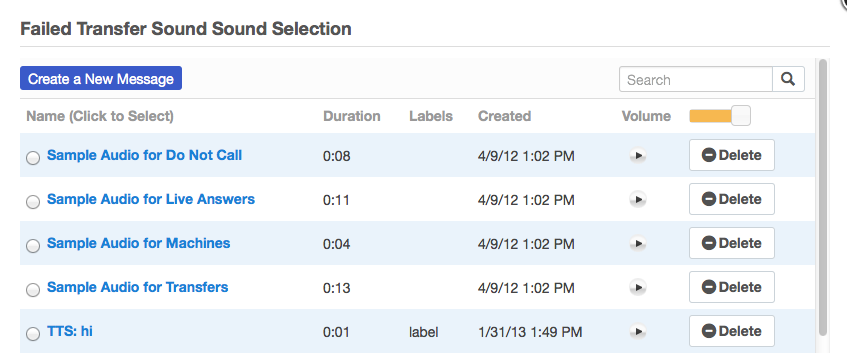
If you have already set up such a recording for callers to hear, you can select it from the list, as shown above. If you would like to create such a message, then click on the Create a New Message button. When you do so, the Create a Message pop-up box appears (shown below), with three options for creating your message: upload, record, and text to speech. More detailed instructions on how to use each of these options can be found in Creating Messages of this help document.

Note that when you create or select an existing message, the name of the file will appear in the Failed Transfer Message field. You can click on the arrow button just to the left of the field to listen to the message that you have selected.
Intro Message (optional)
In this field, you create a recording that callers responding to your Call Tracking number(s) will hear before initiating a transfer. It can be used to inform the caller that the call may be recorded. When you click on the Select a Message button, the Introduction Sound Sound Selection pop-up box appears, and you proceed to set up the message as outlined above.
Whisper Message (optional)
You may have several Call Tracking numbers that you're using concurrently to advertise your business. A whisper message will tell you to which of these numbers your caller is responding. The message is "whispered" just before you or your representative(s) answer the call.
For example, a salesperson could use this message to tell an agent that the lead is from them: "This is a sales lead from abc marketing." Or if multiple numbers go to the same office, it could be used to tell the front desk that "This is a call for the dental office," or "This is a call for the doctor's office."
You set this option as above.
Office Hours
By checking the Office Hours box, you enable "office hours" and can create an after-hours message. As shown below, a check mark appears, and then options for days and times appear. Set the hours that suit you best. Any calls received after those hours will hear your office hours message.
Next, you'll want to designate your location in the pulldown menu, as you see below.
Now, you need to create your message. So click on the Select a Message box in the After Hours Message field. The After Hours Sound Sound Selection pop-up box will appear. Then, select a message from the list, or click the Create Message button and use one of the three options.

As with the other options in the Sound box, you'll soon return to the main page.
back to top
Google Analytics
Google Analytics provides you with detailed statistics about your campaigns, events and visitors. You will need to have an existing Google Analytics account.
When you select this checkbox, three fields will display, as shown below. Enter the appropriate information.
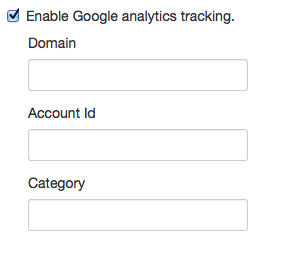
Domain: Please enter your domain name (for example, yourdomain.com)
Account ID: Enter your Google Analytics Key (for example, UA-XXXXXX-X)
Category: Enter an event category (for example, Sales, Support, Westcoast-Sales)
If you are satisfied with your various selections, click on the green FINALIZE button at the bottom of the Call Settings tab to confirm your settings.
Notifications

Check this box to receive an email when anyone calls or texts your number. The email will be sent to the address specified on your Settings page.
back to top
Reset All Data
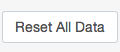
When you click on any one of your call tracking numbers, you will notice a Reset All Data button in the upper left. Click this button to clear all call records, including recordings. This will reset your data to 0.

PLEASE be sure this is what you want to do before you click the Confirm button! This action is permanent.