As we told you earlier, CallFire has multiple double-checks to make sure that your valuable time, effort and money are spent sending out texts and broadcasts to valid numbers. When you create a new campaign or list of contacts, our system automatically performs a number of checks on your behalf, including for proper formatting and duplicate and invalid numbers. We even do a quick comparison against your Do Not Contact list, so you're not accidentally reaching out to folks who have told you they don't want to be bothered again. For you, the result is far more accurate and successful campaigns. Let's learn more!
- Jump to Section
- Validating Contacts
- Validation Steps
- Validation Resolutions
- List Column Mapping
- Multiple Rows with the Same Number
- Contains International Numbers
- Invalid Numbers
- Do Not Call Numbers
- Duplicate Numbers in Campaign
- Existing Contacts
- Terms of Service
Validating Contacts
If you're like many, you may have a number of questions when it comes to this Validating Contacts section. Questions such as ...
What does it mean to "validate" a contact within CallFire's system?
What happens during this process?
And what will I encounter while it is being done?
Rest assured, you've come to the right place for answers!
First off, validating a phone number, or contact, simply means that CallFire's system is checking for you to make sure that the number, in the format you gave it to us, is one that is most likely reachable. As you'll see in the sections below, CallFire has a number of ways it does this. As it does so, you'll be presented a number of notifications and options. We'll try to explain them for you as simply, but compehensively, as possible.
Validation Steps
Once validation begins, you'll notice that each validation process can go through one of five possible steps:
- Pending: The validation is still to be done. (See example below.)
- Failed: The validation failed, and thus there was an "error."
- Resolving: Typically means there was a failed validation and an error resolution is being applied.
- Resolved: The resolution was applied and the validation issue was resolved.
- Passed: The validation passed without errors.
Validation Resolutions
When a validation error occurs, you have three options for resolving it: create new, merge, or scrub.
Create new: This is the simplest of error resolutions. This tells CallFire to do nothing and bypass any error resolution for that validation. For example, if CallFire finds a duplicate number and you retain it, we will call the same number twice during the campaign.
Merge: This error resolution, typically used when numbers are duplicated, tells CallFire to merge the contacts in conflict. Any new data fields will overwrite existing ones. This chart may be helpful:
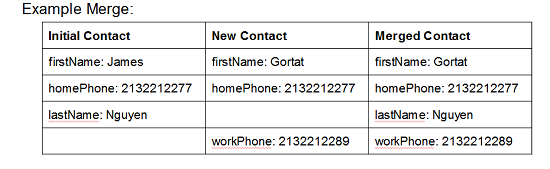
The existing contact was James Nguyen and his home phone was 2132212277. When we upload a new contact called Gortat with the same home phone number, CallFire recognizes this and asks us what we want to do. If we choose to merge the contacts, the new information will overwrite the existing fields (so James becomes Gortat), but if the fields were blank to begin with, the new information will populate them.
Scrub: This error resolution tells CallFire to remove the contact that you are attempting to add to the campaign. For example, if a contact is a duplicate, it tells CallFire to remove the new contact.
List Column Mapping
With the List Column Mapping process, CallFire takes the contact list you created and uses the first row of your document — whether Microsoft Excel or comma-separated value (CSV) file — to create a table for you. You'll want to make sure that the file you use has table columns that are clearly delineated and titled; your limit for each column is 256 characters. This validation will take your contact list and use the first row to automatically detect home phone, cellphone, zip code, etc.
If the column is named ...
- any combination of first name (with or without name), it will be interpreted as a first-name column
- any combination of last name (with or without name), it will be interpreted as a last-name column
- any combination of "home phone", "home number" (with or without either phone or number), it will be interpreted as a home phone column
- any combination of "work phone", "work number" (with or without either phone or number), it will be interpreted as a work phone column
- any combination of "mobile" or "cell", with either "phone" or "number" at the end, it will be interpreted as a mobile phone column
- any combination of "zip code", with or without the "code", it will be interpreted as a zipcode column
Note: if you upload a column of numbers with no header, CallFire will default the numbers to home phone.
Should the columns not match any of these columns, CallFire will assign standard Excel column mapping (columns A-CZ) and go on to detecting columns with phone numbers. It will then prompt you to select the phone number column manually or let CallFire detect the phone numbers. Next, it will show a checkbox that will allow you to tell the system to use this resolution in the future. This answer can be changed at any time by going to the Account Settings page, which can be accessed via the Settings link in the upper-right portion of the CallFire site. Once there, click on List Validation in the left-hand column, which takes you to the List Validation Settings page.
Multiple Rows with the Same Number
CallFire next checks to see if any of the columns identified above contains the same phone numbers, whether mobile, cell, or work number.
Contains International Numbers
This validation checks to make sure that your list does not contain numbers outside the US or Canada. The current system cannot call internationally.
Invalid Numbers
This process ensures that the first six digits of the phone number, also referred to as the NPA-NXX (number plan area-network numbering exchange), are valid. This ensures that 213-555-5555 or 222-222-2222 are not mistakenly tagged as valid numbers. It's a very important check, as it ensures that only valid numbers are attempted. This enables campaigns to run faster, and also makes the very nifty reporting features in CallFire more accurate.
Do Not Call Numbers
This validation runs the list against your Do Not Contact list to see if any of the numbers being uploaded are on your account's Do-Not-Contact numbers. Depending on the type of campaign, CallFire will either scrub against the Do Not Call or Do Not Text list. More about how Do Not Contact works at CallFire is available here.
Duplicate Numbers in Campaign
As the name suggests, this validation checks to see if there are duplicate numbers in the list being uploaded.
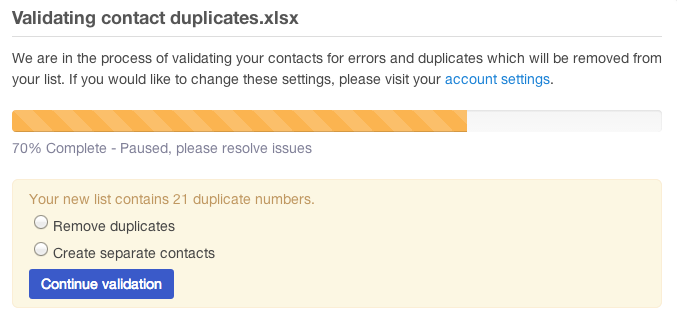
You now have the option to remove the duplicates or to keep them as separate contacts. Note that if you do not remove the duplicates, you will call the same number more than once in a campaign!
Existing Contacts
This validation checks to see if any contacts being added are already in the account. A contact in the list that shares a phone number with an existing contact will be considered a conflict. For example, if you've already uploaded the following contact:
John Doe
Cell: 213.221.2289
Desk: 1 888 555 4864
and you upload another contact:
Jane Doe
Cell: 213.555.5555
Desk: 1 888 555 4864
CallFire will detect them as the same contact. It will then give you the option to retain both as separate contacts, merge them, or ignore the newer contact. Should you choose to merge the contacts, all old information for that contact will be overwritten. If the newer contact has more attributes, they'll be added as well. In the above example, if merge was chosen, the original contact will now be:
Jane Doe
Cell: 213.555.5555
Desk: 1 888 555 4864
It's important to point out that CallFire detects duplicates in any phone number field. So if Jane Doe's cellphone was the same as John Doe's desk, it would also trigger this validation.
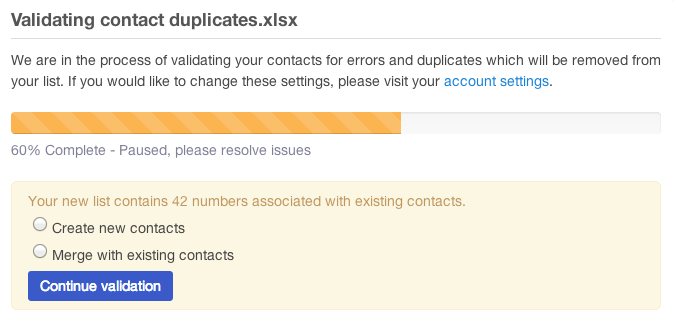
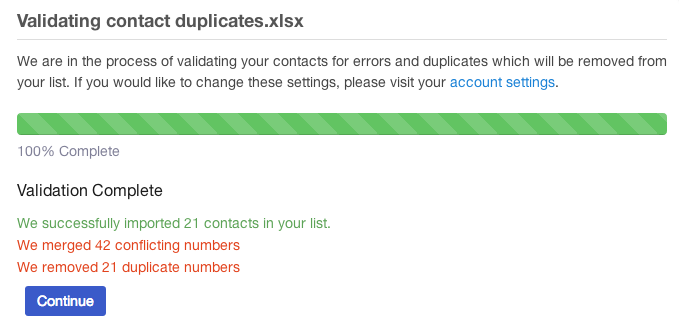
Below you can see that 42 contacts were "merged" into our existing database (so we don't now have two records for John Smith and Mary Jones), and 21 contacts were removed from the campaign (so we don't call Jerry Porter twice in this campaign).
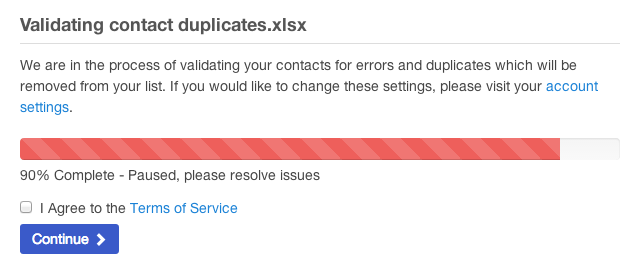
Terms of Service
Finally, you will need to agree to CallFire's Terms of Service, which you can view by clicking the link. Check the box to agree and click the Continue button.