There are two tabs in the IVR Designer. The first — the Basic Tab, gives you numerous options for creating your IVR.
- Jump to Section
- The Basic Tab buttons
- Play button
- Press Menu button
- Key Press button
- Transfer button
- Hangup button
- Goto button
- Record button
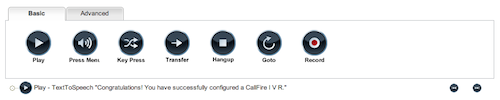
The Basic Tab buttons
When using the drag-and-drop, button-based IVR Designer, you'll quickly notice two tabs: Basic and Advanced. Each has a series of buttons that you'll use to create your inbound or outbound IVR. Let's explore the Basic Tab buttons first.
Play button

The Play button plays any sound file, text-to-speech script, or recording hosted on a URL you designate.
Here's an example of what such a recording might say to listeners: "Hello, this is Tom's Bikes. Thank you for your recent purchase. Would you like to participate in our customer service survey? Press 1 for "yes," press 2 for "no."

When you drag a Play button down into the workspace, you'll notice that a red exclamation-point warning appears.

This means that you need to double-click on that button, and fill in the Set Up New Action box that appears, as shown below. As with all of the IVR buttons, you'll find instructions on the right-hand side of each box.

You'll want to give your play tag a name, and then select your type of sound.
As shown below, the first option you have for type of sound is URL. If you choose this option, enter the URL of the location of the sound file, which is probably being hosted on your site.
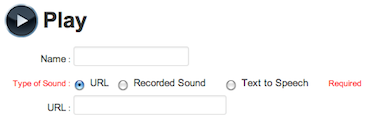
Or, as seen below, you can choose a sound file (recording) from the Recorded Sound pulldown menu. There, you'll see a list of the recordings that you previously created using our Sound Manager system.

Lastly, you can also use our handy text-to-speech option, enter your text-to-speech script, and then choose a male or female voice.

When you're done, click the Ok button at the bottom of the box. You'll notice that the Play button returns to the workspace, showing at least part of your message.

In the right-hand column, you'll also see two arrow buttons. These control the indenting to the right, or movement back to the left, of your button in that row. This helps define the structure of your IVR.

Below, please notice what happens when you click the right-arrow indent button.

Press Menu button

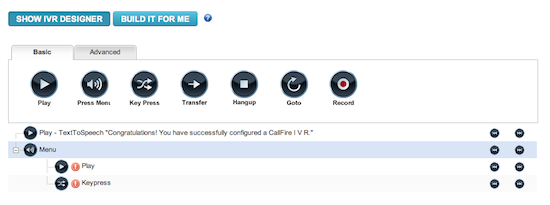
The Press Menu, or Menu button, inserts a menu into your IVR structure, allowing for a type of question-and-answer format. Menus are used to gather keypad input from the user. Think of the Press Menu button as a "container" that hold the questions you present and the answers you receive back. Each menu node requires at least one Play button, or node, within it to present options to the user, and one or more Key Press buttons to handle the incoming key presses.
As you can see below, when you drag a Press Menu button down into the workspace, the Menu button appears, along with two indented buttons: Play and Keypress. Our system automatically assumes that you need one Play and one Key Press tag. You'll also see exclamation points alerting you that you need to further define these buttons.
We discussed how to fill in the Play tag's Set up New Action box earlier. To define the the Menu button, double-click on it, which brings up its Set Up New Action box.

Now, you need to fill in the following boxes:
Name: Give it a name
When done, click the Ok button.
Key Press button

Whether creating an inbound or outbound IVR, you'll need to designate a number, or key press, for each option. These key presses capture the responses that your users give. Each Key Press tag can be a single digit, or if using the default option, a catch-all for all undefined digits.
Double-click on the Key Press button, which brings you to its Set Up New Action box. You'll find helpful instructions on the right-hand side of the box.

Now, you need to fill in the two boxes:
Name: Give your Keypress tag a name.
Pressed: Designate which number you want associated with this tag. (Usually one through nine.)
Then, click the Ok button. Doing so returns you to the the main IVR Designer screen and the IVR that you are creating.
Next, if needed, you create additional Key Press tags and offer listeners more options by repeating the process. You bring down the number of Key Press tags to match the Max Digits figure you entered in the Menu section.
Transfer button
The Transfer button connects the active call to a specified phone number.
You will need to fill in the appropriate boxes:
Name: Give your Transfer button a name, such as "transfer toAgent."
Transfer Number: Enter the number to which the call should be transferred. If you want to specify more than one number, use a comma between each number. Keep in mind that if you specify more than one number, you must then click the Enable Advance Features box.
Enable Advanced Features: Click the Enable Advance Features box, if you care to do so.
Caller ID: Fill in the Caller ID box. For inbound IVR campaigns, you will want to know who is calling, so you enter the following code into the field: ${call.callerid}. For outbound IVR campaigns, you will want the recipients of your call to be able to see your number, so you enter this code: ${call.phonenumber}.
Hold Music: From the pulldown menu, select the type of music you would like those on hold to hear while waiting. It is strongly advised that you make a selection besides silence. Silence often results in confusion for those on hold, since they're sometimes confused about whether or not they have been disconnected.
Transfer Style: If you have defined more than one number, you can choose between two styles of transfer from the pulldown menu. If you want the first available agent to answer, you select "ringall." If you want a particular agent to always be the first option, then select "waterfall." The transfer call will go to the first agent or number in the Transfer Number field. If not answered by this primary agent, it will go to the next number in the box.
Timeout: In the Timeout box, enter the number of seconds you want to allocate to the transfer attempt before either ending the call or transfer attempt. Each ring is approximately five seconds apart, so five rings would be equal to 25 seconds.
Continue After Transfer: The Continue After Transfer button allows you to choose whether you would like to send the user to more tags after attempting the transfer to the number dialed.
Whisper Text-to-Speech: In the Whisper Text-to-Speech box, you enter what you want your agents to hear when a call is being transferred to them. For instance, if you have different businesses, and want your agents to know the call is regarding your mortgage company, you might enter "mortgage."
Hangup button

The Hangup button forces the call to be disconnected. It should appear at the end of each branch of your IVR structure. You'll need to fill out the Name box, as shown below.

Goto button

The Goto button makes the call jump to a particular node, or specific tag, within your IVR. You specify that node by the name you gave it earlier.

You need to fill out the following boxes:
Name: Give your tag a name.
Goto Node: Select the node to which you'd like to jump.
Record button

The Record button can either create a recording, which starts with a beep and ends with the user pressing pound, or it can record the remainder of the call. For advanced users, combining this function with the Stash and Get buttons will allow you to push a link to the recorded file's URL. The URL is created by generating a unique hash for this call.

You need to fill out the following boxes:
Name: Give your tag a specific name.
Variable Name: Define your variable.
Record rest of call: Click the box, if desired.
Then, click okay.